

How to Make Gluten-Free Biscuits Everyone Will Love This Easter
Easter is a time for family, celebration, and indulging in delicious treats. But if you're following a gluten-free diet, baking can sometimes feel like a challenge. This year, I decided to experiment with gluten-free baking for Easter, and guess what? The gluten-free biscuits I made were a huge hit! They're easy to whip up, incredibly tasty, and perfect for anyone looking to enjoy a festive treat without the worry of gluten.
Want to learn how to make them? I’ve got you covered with a step-by-step recipe, tips to perfect your bake, and creative ways to serve these delicious biscuits!
The following content may contain affiliate links. When you click and shop the links, we receive a commission.
Why Go Gluten-Free?
Why choose gluten-free biscuits, especially during a celebration like Easter? For some, it’s a matter of necessity due to gluten intolerance or celiac disease, but for others, it’s a choice toward lighter eating and better digestion. Gluten-free baking ensures that everyone around the table can enjoy the festivities without feeling left out. Plus, with so many wonderful gluten-free flour options now available, the end result isn’t just a compromise; it’s truly delicious!
This recipe isn’t just for those who can’t eat gluten, though. It’s also for anyone curious about gluten-free baking or looking to expand their baking repertoire. Trust me, you’ll be surprised at how good these taste!

Recipe Ingredients
Before you get started, make sure you’ve got everything ready. Here’s what you’ll need to bake these heavenly biscuits.
Ingredients:
2 1/4 cups gluten-free Bob’s Red Mill 1:1 baking flour (I used Einkorn Flour, which I prefer because it’s less grainy, but any quality gluten-free blend works.)
1 tablespoon baking powder
2 teaspoons stevia or coconut sugar
1/2 teaspoon baking soda
1 teaspoon salt
1 3/4 cups 1/2 and 1/2 (or substitute with almond or oat milk for a dairy-free option)
1/2 cup butter, melted (coconut oil also works beautifully as a dairy-free alternative)
Feel free to modify these ingredients based on dietary preferences or what you have available in your pantry!
Step-by-Step Instructions
Making these biscuits is a breeze, and I promise you don’t need to be a professional baker to nail this! Here's how to do it:
Step 1: Preheat the Oven
Preheat your oven to 450°F. Line a baking sheet with parchment paper to prevent sticking.
Step 2: Mix the Dry Ingredients
In a large mixing bowl, whisk together the gluten-free flour, baking powder, stevia (or sugar), baking soda, and salt. This step ensures the leavening agents are evenly distributed for a proper rise.
Step 3: Add the Wet Ingredients
Create a well in the center of the dry ingredients and pour in the 1/2 and 1/2 or almond milk if you prefer that and lower calorie option and gently mix until a soft dough forms. Be careful not to overwork the dough, as this can make the biscuits dense.
Step 4: melt the butter
Take the 1/2 cup butter and pour this to the bottom of the pan, then scoop the biscuit dough into the prepared pan. Using wet hands, spread the dough into an even layer. (Note, some people like to pour the butter on top, I prefer the bottom!) The dough can be VERY sticky!
Step 5: Bake
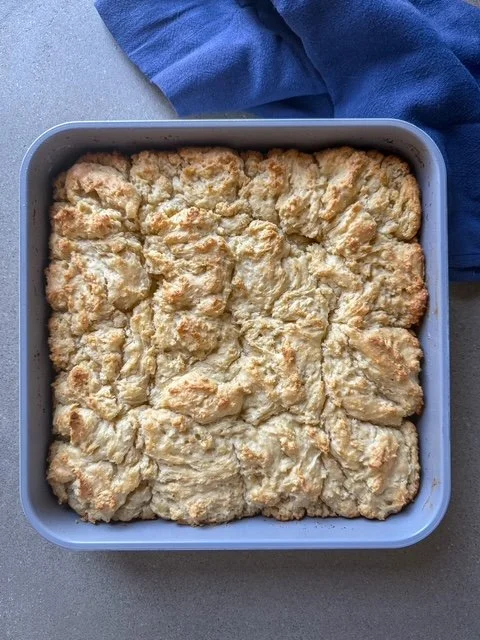
Place the biscuits onto the prepared baking sheet, then use a sharp knife to cut them into 9 or 16 squares depending on the size you want, try to make this as even as possible. Bake for 25-30 minutes, or until the tops are golden brown.
Step 6: Cool and Serve
Allow the biscuits to cool slightly before serving. They’re best enjoyed warm, fresh out of the oven.
Here are a few other recipes from the blog that everyone loves:
Protein Packed Asian Beef Bowl
Flavor Packed Chicken Buddha Bowl


Tips & Tricks for Perfect Gluten-Free Biscuits
To make sure your biscuits are perfect every time, here are some tips I’ve learned from my baking adventures:
Don’t Skip the Parchment Paper: It makes clean-up easier and helps the biscuits bake evenly.
Keep Things Cold: Cold butter or 1/2 and 1/2 ensures the biscuits rise beautifully.
Experiment with Flavors: Want a savory twist? Add fresh herbs like rosemary or thyme. Prefer sweeter biscuits? Toss in cinnamon or a pinch of cardamom.
Dairy-Free Option: Replace the butter with coconut oil and use unsweetened almond milk as a substitute for 1/2 and 1/2.
Don’t Overmix: Overworking the dough can activate the starches, leading to dense rather than light, fluffy biscuits.
Feel free to get creative and make this recipe your own!
Easy Gluten-Free Biscuits for Easter Everyone Will Love

Learn how to make delicious gluten-free biscuits perfect for Easter celebrations. Simple, tasty, and family-approved recipe with step-by-step instructions!
Ingredients
- 2 1/4 cups Eikhorn Flour
- 1 tablespoon baking powder
- 2 teaspoons coconut sugar
- 1/2 teaspoon baking soda
- 1 teaspoon salt
- 1 3/4 cups 1/2 and 1/2
- 1/2 cup butter, melted
Instructions
- Preheat your oven to 450°F. Line a baking sheet with parchment paper to prevent sticking.
- Mix the Dry Ingredients - In a large mixing bowl, whisk together the Eikhorn, baking powder, stevia (or coconut sugar), baking soda, and salt. This step ensures the leavening agents are evenly distributed for a proper rise.
- Add the Wet Ingredients - Create a well in the center of the dry ingredients and pour in the 1/2 and 1/2 or almond milk if you prefer that and lower calorie option and gently mix until a soft dough forms. Be careful not to overwork the dough, as this can make the biscuits dense.
- Melt the butter - Take the 1/2 cup butter and pour this to the bottom of the pan, then scoop the biscuit dough into the prepared pan. Using wet hands, spread the dough into an even layer. (Note, some people like to pour the butter on top, I prefer the bottom!) The dough can be VERY sticky!
- Bake - Place the biscuits onto the prepared baking sheet, then use a sharp knife to cut them into 9 or 16 squares depending on the size you want, try to make this as even as possible. Bake for 25-30 minutes, or until the tops are golden brown.
- Cool and Serve - Allow the biscuits to cool slightly before serving. They’re best enjoyed warm, fresh out of the oven.

Nutrition Facts
Calories
117Fat
6 gSat. Fat
4 gCarbs
14 gFiber
0 gNet carbs
14 gSugar
0 gProtein
2 gSodium
306 mgCholesterol
15 mgThe nutrition information provided is only estimated based on an online nutritional calculator. I am not a dietician. Please consult a doctor for accurate, more personal information about your health and any dietary restrictions and concerns you may have.
Creative Serving Suggestions
These gluten-free biscuits are versatile and pair beautifully with both sweet and savory options. Here are a few ideas to elevate your Easter table:
Classic Butter and Jam: Spread a dollop of butter and your favorite jam or marmalade for a comforting treat.
Honey Glaze: Drizzle with warm honey for an added touch of sweetness.
Strawberries and Cream: Top with sliced strawberries and freshly whipped cream for a dessert-inspired version.
Savory Spread: Pair with herb-infused cream cheese or a smoked salmon dip as an elegant appetizer.
Easter-Themed: Use cookie cutters shaped like bunnies or eggs to give these biscuits a festive twist.
Whether it’s breakfast, brunch, or an afternoon snack, these biscuits are sure to impress.


Make Your Easter Extra Special
This gluten-free biscuit recipe is not only easy but also a perfect fit for Easter celebrations. They’re light, flavorful, and fit seamlessly into any springtime meal. My family couldn’t believe these were gluten-free, and I’m confident yours will love them just as much!
Why not give them a try and see for yourself? I’d love to hear how your baking turns out! Share your thoughts, variations, or even pictures in the comments below. Your creativity might inspire others in our baking community.
Happy Easter and happy baking! 🍪🌸
We’d love to see your creations! Snap a photo, share it on social media, and tag us at @angiebloom. Have questions, or want to share your favorite add-ins? Drop a comment below or connect with us via email.
If you're looking for more healthy recipes and cooking tips, be sure to sign up for our newsletter, here. Happy baking!


FAVORITE POST:

I created this brand to bring you the best in wellness, nutrition, fitness and clean beauty!

Discover your perfect skincare match—take the Oliveda quiz now and glow like never before!


